I spend a lot of time behind my laptop. To try and make the most of it, I enjoy getting to know my tools, with the aim of improving both my comfort and my productivity. A big part of this is done by using shortcuts and automations, which not only makes me move faster with much less arm movement but also takes away a lot of friction. Hopefully future me will benefit from that.
macOS
My laptop of choice is a MacBook, and it runs macOS. Everything in this section uses native features and doesn't require any third-party apps.
Spaces
I tend to have apps and windows open for different projects or modes. For example, I have a Safari window with a bunch of personal tabs, another one with work related tabs, and then also some additional apps for work. Instead of keeping all this on the same desktop, I use spaces. This lets me set up multiple desktops and give each desktop its own focus.
To efficiently use spaces, it's important to efficiently switch between them. As explained in the macOS User Guide linked above, by default this can be done in one of three ways:
- Swipe left or right with three or four fingers on a trackpad, or with two fingers on a Magic Mouse.
- Press the
Controlkey together with the left or right arrow. - Open Mission Control and select the desktop in the top of the screen.
While functional, none of these are ideal. The first one requires moving a hand off the keyboard, the second one does as well (and even after following my suggestion below to add additional arrow keys it's still awkward), and the third one is just plain cumbersome. Sure, you could set up a hot corner for the latter, but then we're back to moving a hand off the home row.
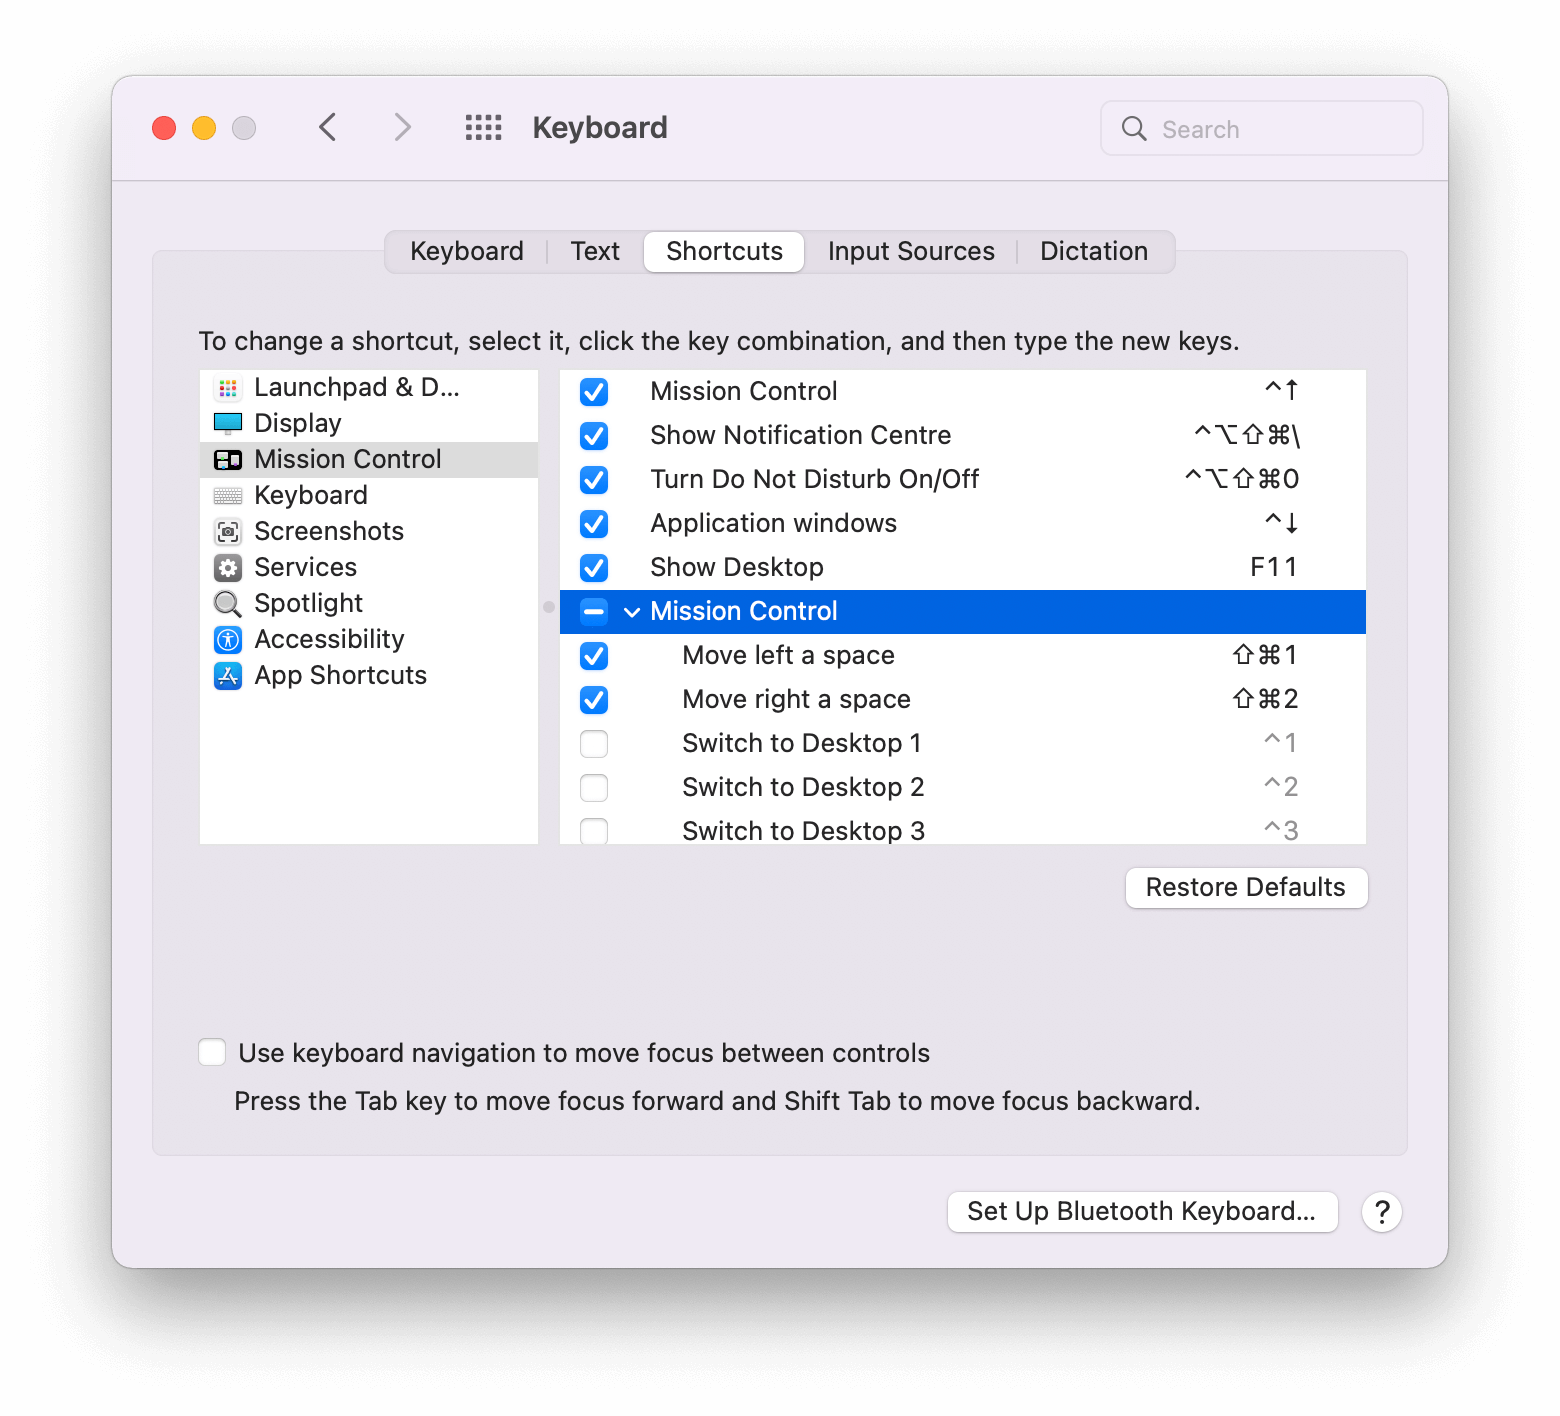
I suggest a different approach. Go to System Preferences → Keyboard → Shortcuts, and select Mission Control on the left. There, look for the two actions Move left a space and Move right a space and replace the default shortcuts with Command-Shift-1 and Command-Shift-2, respectively. Now you can move smoothly between spaces without relocating your hands, and so far I haven't noticed any conflicts.
Assign Apps to Spaces
Once you're using spaces, you might find that the mapping of one app per space isn't always ideal. For some apps this doesn't matter since they allow multiple open windows (such as Finder or Safari), but for others this isn't possible (such as Mail or Messages). When opening these apps, then, there'll be a sudden jump to the space the app is opened on.
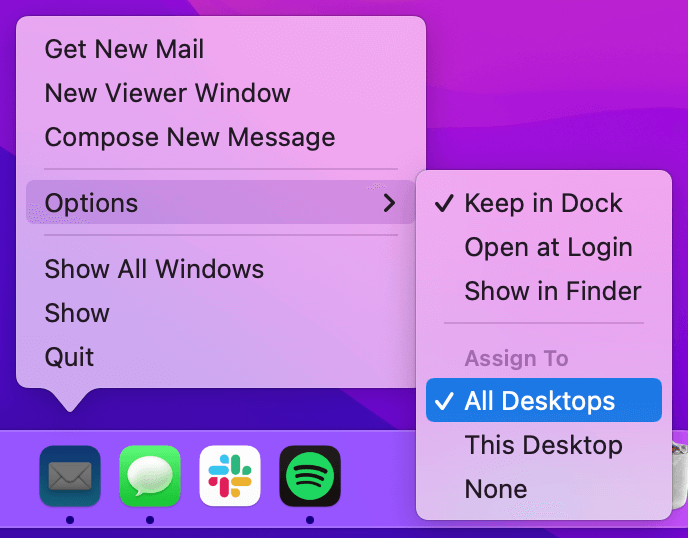
Luckily, this can be fixed. Let's say you have a space for work and a space for personal stuff, and both of them need to have access to the Mail app. Right click on the Mail app icon in the Dock and go to Options → Assign To. The default setting is None, but you can also assign the app to a specific desktop (This Desktop) or—what we're looking for here—to All Desktops.
Now, whenever you open the Mail app, it will open on the space that you're already on.
Hot Corners
Hot corners associate certain actions with the corners of the screen, which are then activated by moving the cursor into that corner.
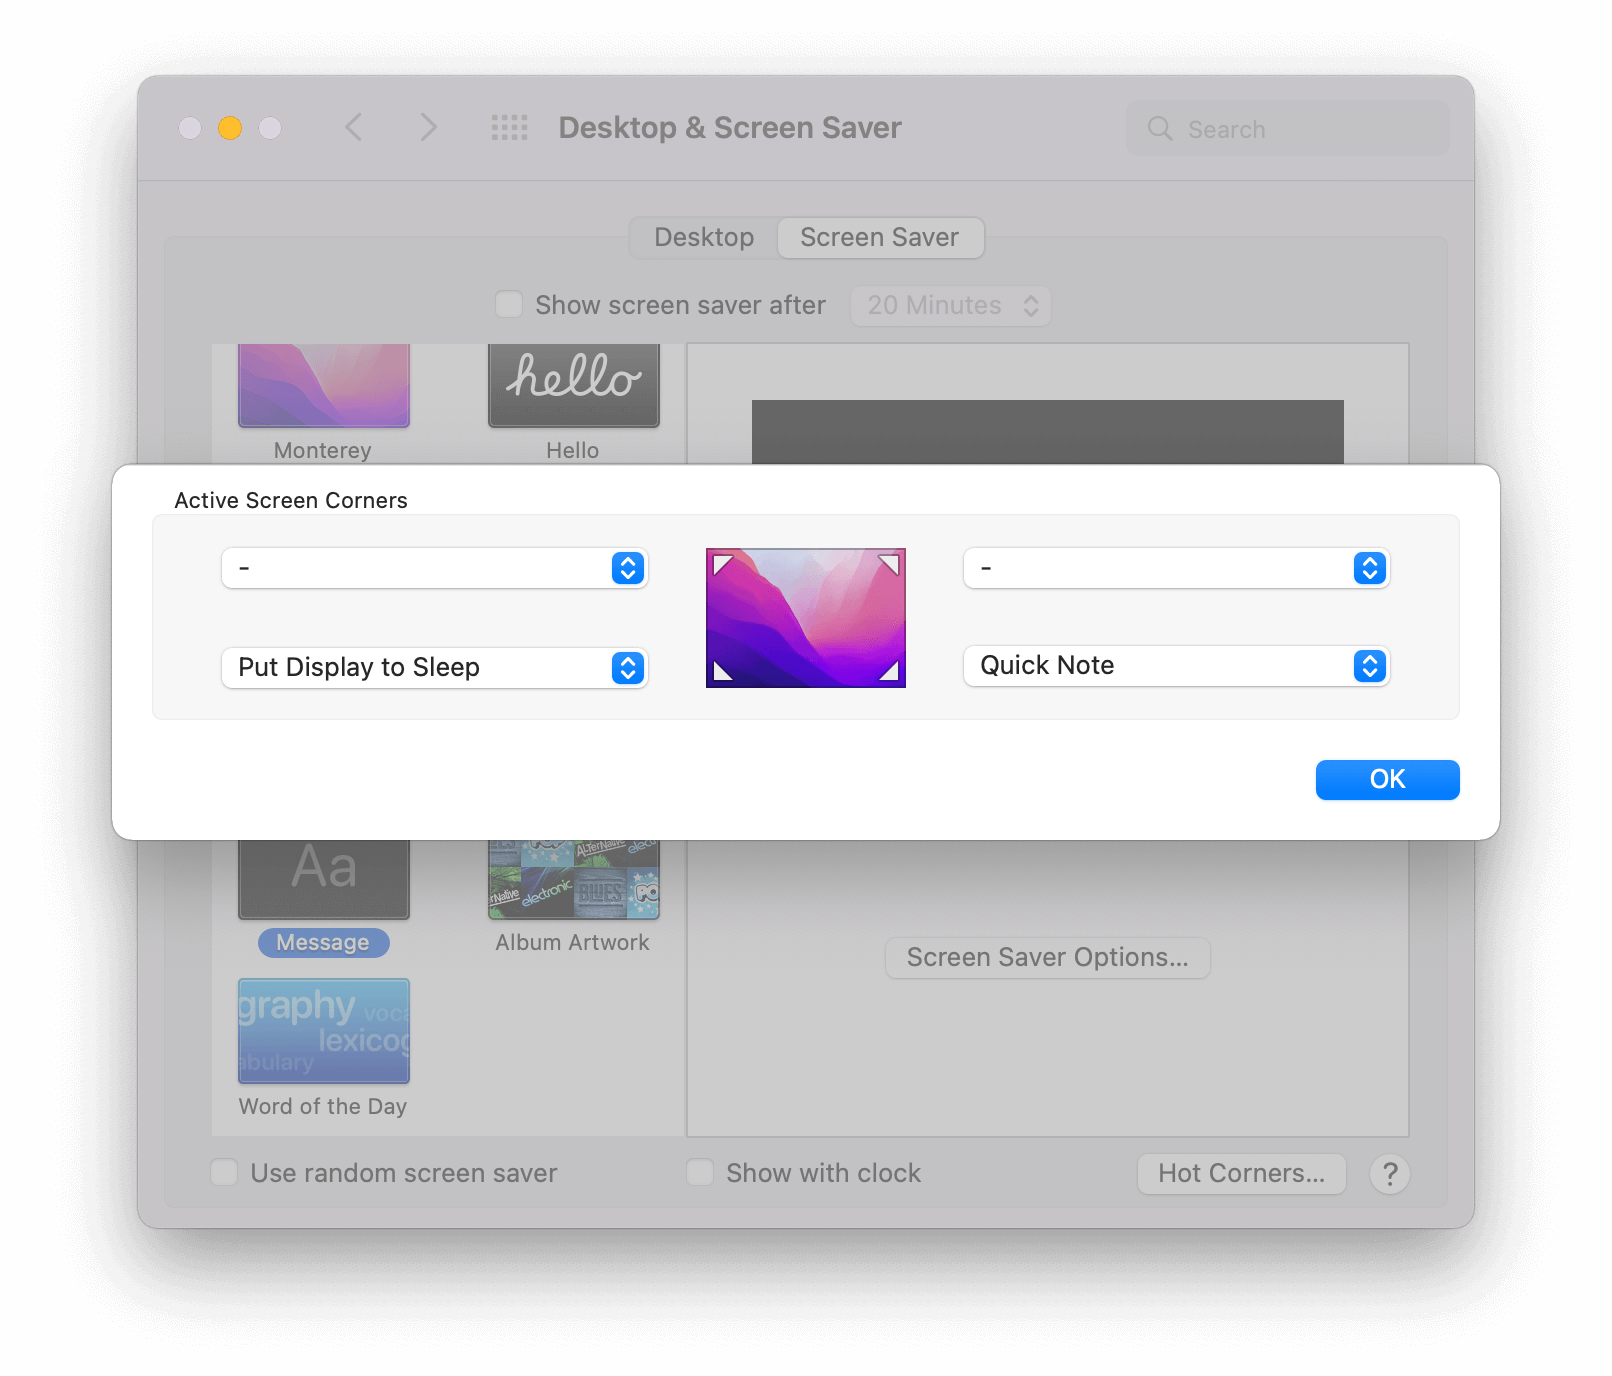
I'm not a big fan of them, since I find them prone to accidental activations and they require moving a hand off the home row. But, there's one I do find convenient, and that's to set the bottom left corner to Put Display to Sleep. It's less of a necessity now while working from home, but back when I was working at an open floorplan office it was ideal to quickly lock my MacBook. I wouldn't even have to think about it—just flick the cursor into the bottom left corner while getting up or walking away and I was set.
To set this up, go to System Preferences → Desktop & Screen Saver → Hot Corners….
Dock
This one doesn't necessarily benefit my productivity, but in general I find that it helps my peace of mind to declutter my screen, and a big part of that is the Dock.
First, I have it set to automatically hide and show. This just removes it from the screen entirely until needed, which isn't actually all that often. To do this, go to System Preferences → Dock & Menu Bar and check Automatically hide and show the Dock.
Second, I removed all apps from it that I never or rarely use. It always surprises me to see people with a bunch of default apps in there without bothering to remove them. Either right click on them and then click Remove from Dock or simply drag them off of it.
Third, I added some spacer tiles, which are just empty spaces that can be moved around to create sections within the Dock. To create these:
-
Launch Terminal.
-
Enter the following command to create a spacer tile:
$ defaults write com.apple.dock persistent-apps -array-add '{tile-type="spacer-tile";}' -
Enter the following command to restart the Dock:
$ killall Dock
You can add as many tiles as you like, and just as with regular apps they can be dragged around the Dock and removed to your liking.

Screenshots
macOS has extensive screenshot taking capabilities built in. For a full overview see their support article, but here is a summarized overview:
Command-Shift-3to save a screenshot of the entire screen to file (by default on Desktop).Command-Control-Shift-3to save a screenshot of the entire screen to clipboard.Command-Shift-4to save a screenshot of an area to file (by default on Desktop).Command-Control-Shift-4to save a screenshot of an area to clipboard.Command-Shift-4thenSpaceto save a screenshot of a window to file (by default on Desktop).Command-Control-Shift-4thenSpaceto save a screenshot of a window to clipboard.Command-Shift-5to start a screen recording.
I particularly like the options to screenshot an area or a window. Also good to know: when you have an area already selected you can press Space to drag the selection around, Option to resize the selection from the center, or Shift to change the selection from just one side while keeping the other as is.
Normally I take screenshots directly to clipboard, but to add markup it needs to be saved to a file. However, if you click on the little screenshot preview in the bottom right of the screen right after taking a screenshot, and then use the markup functionality, you can press Command-Option-C to copy the result to clipboard and prevent it from actually being saved to file. Win-win.
Shortcuts
To round up the macOS section, here are some default shortcuts I use a lot. Some of these might seem simple, but it also means it's a good starting point to really get into the habit of using shortcuts, especially once you start combining them.
Two things I just want to point out:
- You can often add
Shiftto a shortcut to do the reverse of the original shortcut. Examples of this are moving focus between elements going forward (Tab) and backward (Shift-Tab), going to the next (Enter) or previous (Shift-Enter) search result, or switching between tabs or applications (see below). - You can use the menu bar menus to see available actions and their corresponding shortcuts. Lots of apps have shortcuts available, and the best way to start learning them is to just see what's there. You can also press
Command-Shift-/to search within an app's menu items, which will then highlight where the menu item can be found and what its shortcut is (if any).
General
Ctrl-x,Ctrl-c, andCtrl-vto cut, copy, and paste, respectively.Option-Deleteto delete the previous word.Command-Deleteto delete the previous line.Command-,to open the app settings.Command-Fto search.Command-Hto hide the front app.Command-Wto close a tab.Command-Qto quit an app.Command-Tabto switch between applications.Command-Shift-Tabto switch between applications in reverse order.Command-`to switch between application windows.Fn-Cto open Control Center.Fn-Eto open the emoji picker.Fn-Nto open Notification Center.
Browser
Command-Tto open a new tab.Command-Shift-Tto reopen the most recently closed tab.Command-[1–9]to go to the nth tab.Command-0to go to the last tab.Command-Lto focus on the URL bar.Control-TaborCommand-Shift-]to move between tabs.Control-Shift-TaborCommand-Shift-[to move between tabs in reverse order.
Karabiner-Elements
The app powering most of my custom shortcuts is Karabiner-Elements. With it, you are able to set up flexible and powerful keyboard modifications.
There are four modifications in particular I recommend, and I find that the easiest way to set these up is to edit the configuration file directly. Go to Karabiner-Elements → Misc and click Open config folder (~/.config/karabiner). Then, with your text editor of choice, open karabiner.json and add the code samples shown in the subsections below under profiles[x].complex_modifications.rules.

Remap Caps Lock to Escape
I rarely use the Caps Lock key. I just don't shout a lot, and I suspect that's the case for many people. Considering it's so rarely used, then, the Caps Lock takes up quite the prominent position on the keyboard.
Now, the Escape key is useful to me. Not in the least because I use Vim, but even in normal day-to-day use there's plenty of moments where quickly dismissing something with it is great, and by remapping the Caps Lock to Escape it's significantly more accessible.
{
  "description": "Change caps_lock to command+control+option+shift (escape when pressed alone)",
  "manipulators": [
    {
      "type": "basic",
      "from": {
        "key_code": "caps_lock",
        "modifiers": {
          "optional": [
            "any"
          ]
        }
      },
      "to": [
        {
          "key_code": "left_shift",
          "modifiers": [
            "left_command",
            "left_control",
            "left_option"
          ]
        }
      ],
      "to_if_alone": [
        {
          "key_code": "escape"
        }
      ]
    }
  ]
}Caps Lock. However, this falls short when wanting to do more complex modifications, as I describe in the following subsections.Remap Caps Lock to Hyper Key
Didn't I just tell you to remap Caps Lock to Escape? Yes, I did. But that was for a single press. With Karabiner-Elements you can set up more complex modifications where you differentiate between a single press (pressing just that one key) and a combined press (pressing multiple keys at the same time).
The Hyper key is the combination of all four modifier keys—Command, Control, Option, and Shift. Performing this keyboard manually would quickly become painful, and therefore it's a combination that's never used. That's great, because it means that we're free to combine it with any other key for custom shortcuts without having to worry about it conflicting with any app or system shortcuts.
This keyboard modification is what enables nearly all of my macros, as described in the Keyboard Maestro section.
Remap Shift-Caps Lock to Caps Lock
As pure as my intentions are, sometimes I just have to raise my voice from behind the laptop. In such cases it's useful to have an alternative way of activating Caps Lock, considering we have lost the default Caps Lock key. By remapping the combination of Shift and Caps Lock to do this, I keep the new functionality of Caps Lock to act as Escape and the Hyper key while having a way to fall back on the original behavior.
{
  "description": "Use shift+caps_lock as caps_lock",
  "manipulators": [
    {
      "type": "basic",
      "from": {
        "key_code": "caps_lock",
        "modifiers": {
          "mandatory": [
            "shift"
          ],
          "optional": [
            "caps_lock"
          ]
        }
      },
      "to": [
        {
          "key_code": "caps_lock"
        }
      ]
    }
  ]
}
Remap fn + h/j/k/l to Arrow Keys
Lastly, this is an easy way improve my navigational abilities. The arrow keys are useful, but they're badly positioned since they require moving a hand off the home row to reach them. By remapping the fn key to work together with the h, j, k, and l keys to act as arrows they're really quick to use.
{
  "description": "Change fn + h/j/k/l to arrow keys",
  "manipulators": [
    {
      "type": "basic",
      "from": {
        "key_code": "h",
        "modifiers": {
          "mandatory": [
            "fn"
          ],
          "optional": [
            "any"
          ]
        }
      },
      "to": [
        {
          "key_code": "left_arrow"
        }
      ]
    },
    {
      "type": "basic",
      "from": {
        "key_code": "j",
        "modifiers": {
          "mandatory": [
            "fn"
          ],
          "optional": [
            "any"
          ]
        }
      },
      "to": [
        {
          "key_code": "down_arrow"
        }
      ]
    },
    {
      "type": "basic",
      "from": {
        "key_code": "k",
        "modifiers": {
          "mandatory": [
            "fn"
          ],
          "optional": [
            "any"
          ]
        }
      },
      "to": [
        {
          "key_code": "up_arrow"
        }
      ]
    },
    {
      "type": "basic",
      "from": {
        "key_code": "l",
        "modifiers": {
          "mandatory": [
            "fn"
          ],
          "optional": [
            "any"
          ]
        }
      },
      "to": [
        {
          "key_code": "right_arrow"
        }
      ]
    }
  ]
}h, j, k, and l might seem arbitrary, but it means you can navigate with just your right hand all from the home row.Keyboard Maestro
With the Hyper key set up, a wide range of new possible shortcuts are unlocked. To best make use of this I use Keyboard Maestro, which is built around the concept of macros. A macro is a collection of actions that can be activated through so-called triggers. You describe what you want it to do and specify how you want those actions to activate and Keyboard Maestro will then take care of it.
This probably sounds a bit abstract, but it's also what makes it so flexible and powerful. More than the other suggestions so far, Keyboard Maestro is a personal app in that it's likely to be tailored to each user's needs and workflows. As such, rather than just diving into the "how", I'll also try and explain the "why" behind my setup.
Organization
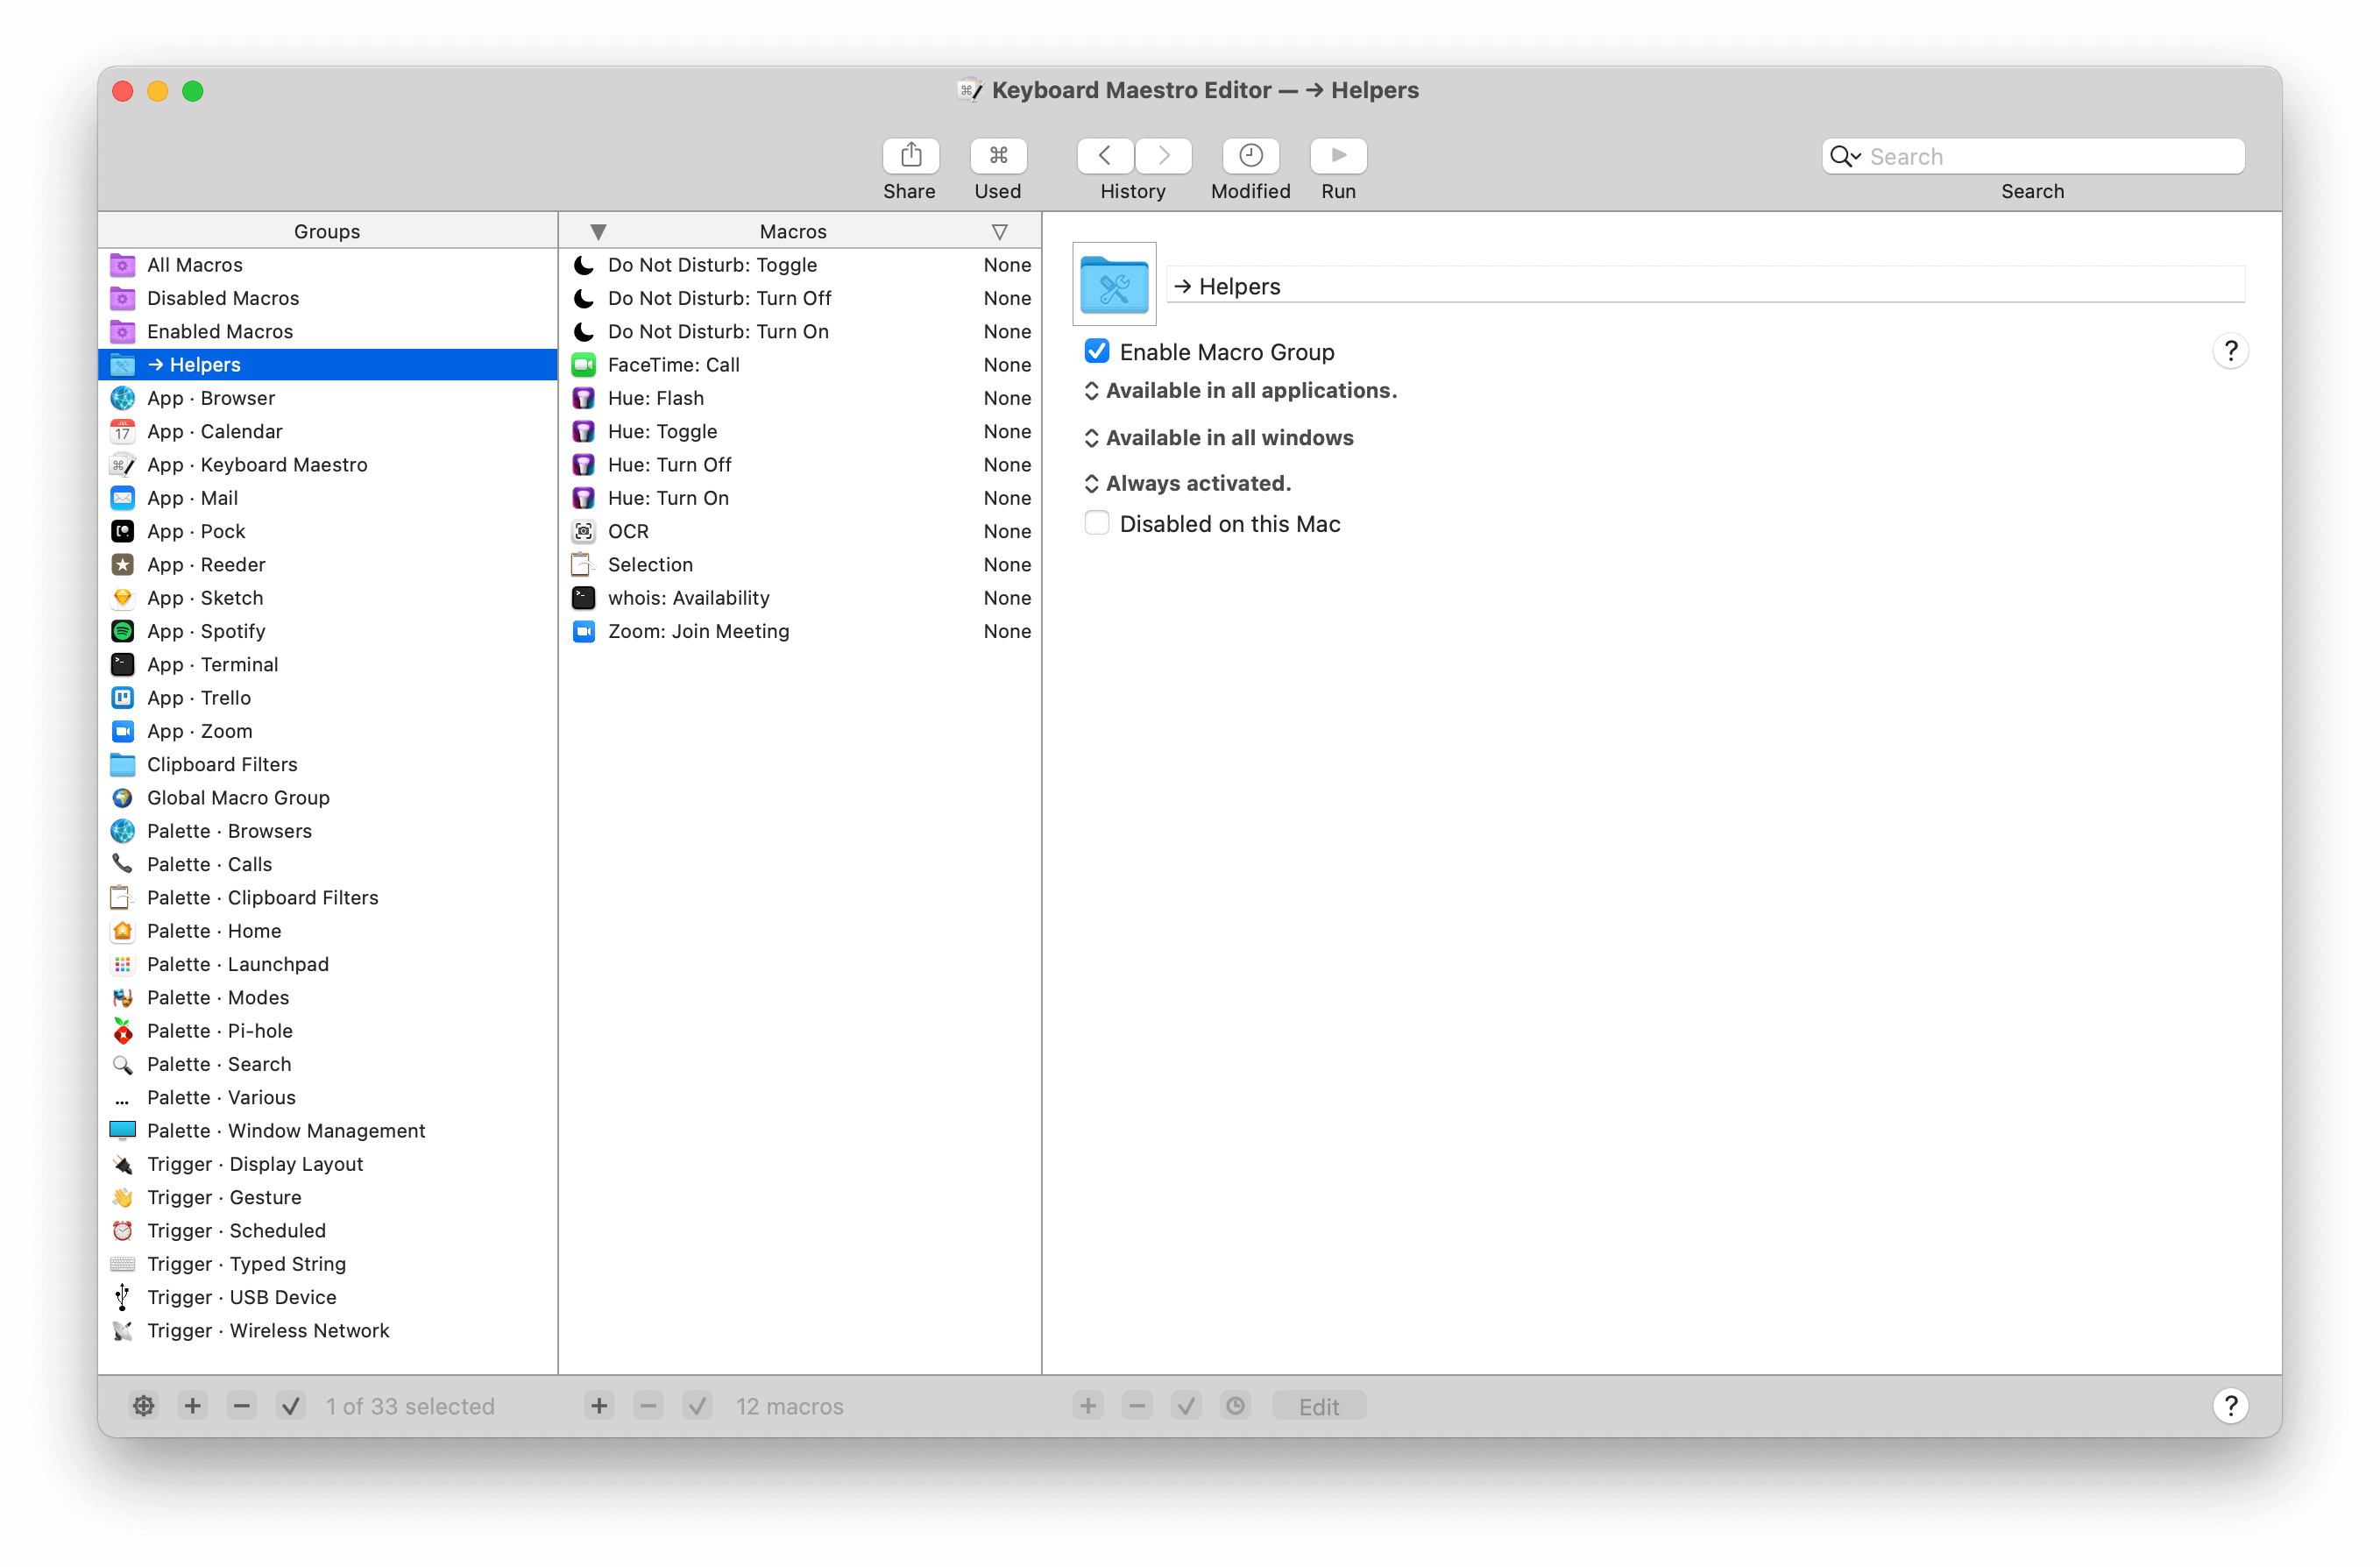
The app consists of three main panes: one for macro groups, one for macros, and one for the contents of the macro. These macro groups can be used just for organizational purposes, but also to have them share a certain characteristic (such as for palettes).
As my library of macros grew, I found it helped to keep them well organized. I tried a few approaches, but the one I have now is to use three types of macro groups:
- App · [Name]: These contain macros related to a specific app.
- Palette · [Name]: These open up a specific palette.
- Trigger · [Name]: These contain macros using a specific trigger other than hot keys.
Other than that, I also have a → Subroutines group, with the arrow to keep it sorted on top. This contains macros that I don't use directly; instead, they contain generic actions that I execute from other macros. This lets me keep the main logic in one place, so if I ever have to update it I know where to do it and I only have to do it once.
To use these, insert the action called "Execute a Subroutine". You can define and pass along parameters as well, as well as pass data back to the initial macro. See the examples subsection for inspiration on how to use this.
Palettes
Palettes are by far my most used feature of Keyboard Maestro. With it, a small overlay opens up that lists all the macros within the group, including (optionally) their icon and their trigger.
There's a few different ways of having palettes show up, but my favorite is to use Shows a palette for one action when → The hot key … is pressed. With this, pressing the specified hot key will show the palette, and triggering any of its macros will hide it again.
Escape to discard it, but that doesn't work—it uses Enter for that instead. As a workaround, I normally add an empty macro with Escape as the trigger. Not ideal, but it makes more sense to me than the default.As mentioned earlier, the combination of the Hyper key is so impossible it's never used, and it can therefore be freely used for any combination. However, if you start using it for all your shortcuts directly, you'll soon find that you run out of sensible combinations.
So, instead, I use palettes to group macros, and—where possible—use mnemonic shortcuts to trigger them. Once the palette is open you don't necessarily need unique shortcuts anymore, so you can assign each of the macros within the palette a single letter as hot key. With this, it's one more key press compared to directly triggering the macro, but it doesn't pollute your global shortcuts, groups your macros nicely together, and gives you a nice little overlay to see the available macros, in case you need the reminder.
Here are some examples of palettes I use:
-
A palette called "Browsers" that's triggered with
Hyper-B, letting me open up a new window in any of three installed browsers.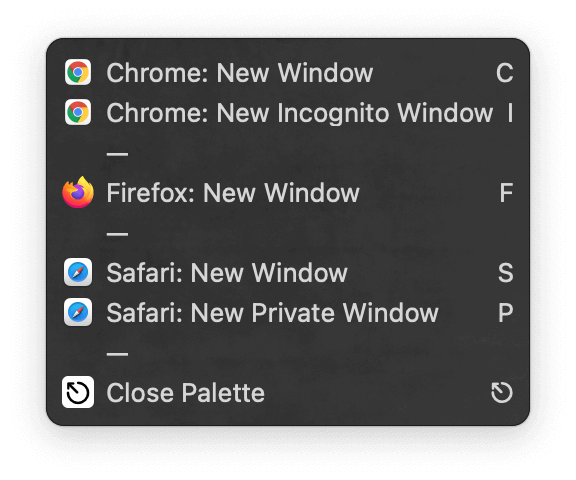
-
A palette called "Calls" that's triggered with
Hyper-C, letting me FaceTime certain people or join certain Zoom calls (with a global mute/unmute).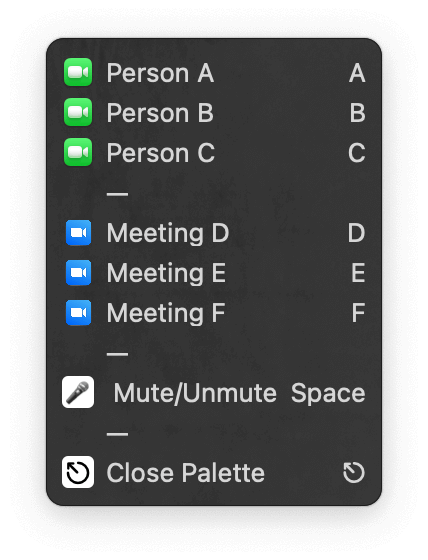
-
A palette called "Launchpad" that's triggered with
Hyper-L, letting me jump between my most frequently used apps.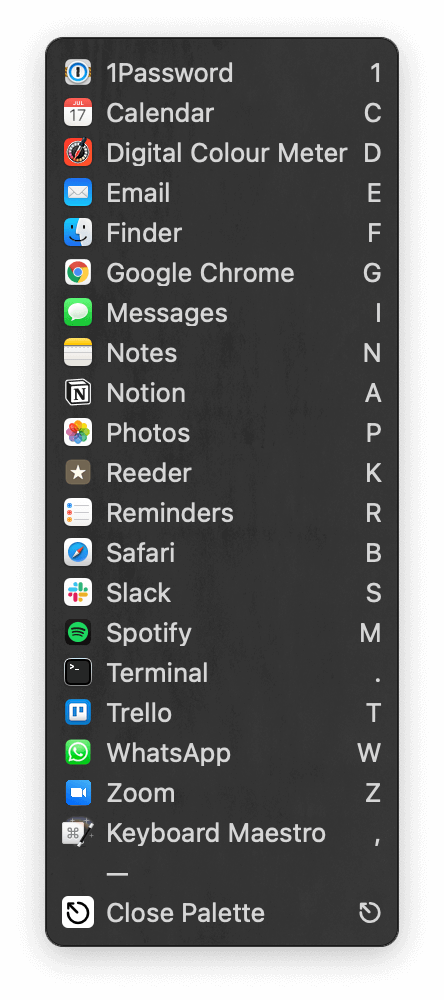
-
A palette called "Modes" that's triggered with
Hyper-M, letting me start and end modes such as for work or exercise.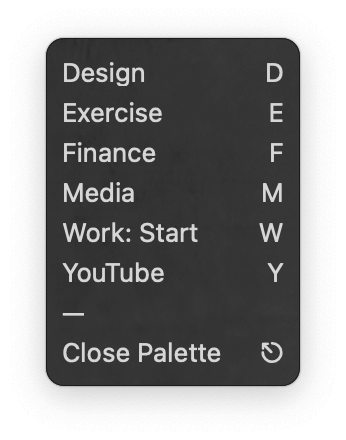
-
A palette called "Search" that's triggered with
Hyper-S, letting me type in a query from wherever and have it directly open up the results.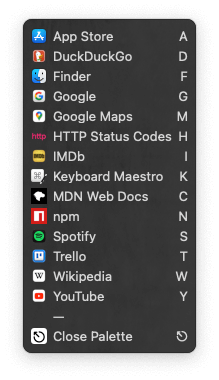
Window Management
I previously used a dedicated app for window management, but when I discovered that Keyboard Maestro has this functionality built in I quickly moved over. I'm sure it lacks some features found in dedicated apps, but it's enough for my needs. I use it in two ways:
-
As a palette: Similarly to the palettes described above, this presents an overlay with all my presets, which I then trigger with one additional hot key. I use
Hyper-Tabfor this, with the mnemonic thatTabis also involved in switching between apps.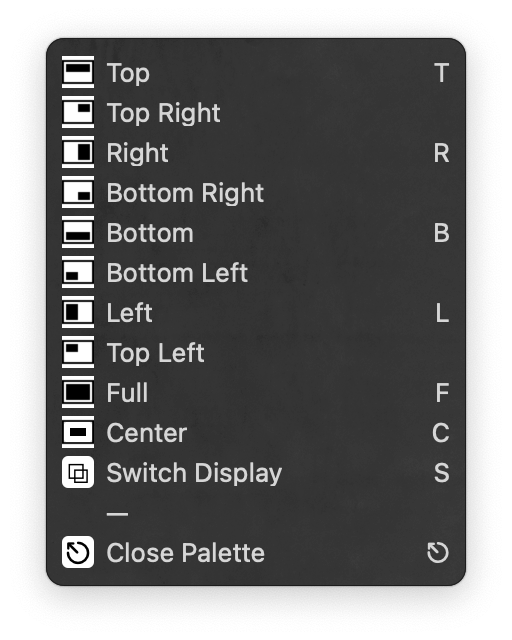
-
As gestures: Keyboard Maestro can recognize gestures you make with your finger on your trackpad as triggers for macros. On its own this isn't very useful because it conflicts with regular trackpad usage, but, again, in combination with the
Hyperkey (or any other key, for that matter) you're all safe from that. I have a macro for each swipe direction (horizontally, vertically, and diagonally) to let me intuitively swipe a window to a certain side or corner of the screen.
Typed Strings
Macros can also be triggered by typing a sequence of characters. The only caveat here is that it will also trigger when you're in a text input, so you need to make sure it's not a combination of keys you'd normally use. I prefix most of my typed strings with ; so as to avoid that.
These typed strings are particularly useful for inserting snippets of text. I have a few of these, and to keep them organized I namespace them, meaning I group macros with a similar purpose together under the same prefix. For example, I have ;dt for inserting tomorrow's date and ;dy for inserting yesterday's date. And I have a wide range of typed strings starting with ;f which then insert dummy data (such as ;fs for a Lorem ipsum sentence or ;fe for a fake email address).
Finally, I have a few typed strings for characters I frequently use, such as the arrow I use in this post ("→") that's inserted whenever I type ->, or the multiplication sign ("×") that's inserted whenever I type ;x,
Automations
I have a few macros that are set and forget. They're triggered by things that just happen automatically, so they don't require my input. For example:
- Whenever I connect my MacBook to my external monitor my desk light is turned on and Do Not Disturb is turned off (with the assumption that it's time to work and I'll need to see those Slack notifications).
- Whenever I am in a Zoom call my desk light turns red, like an on-air light. Then, it's reset when I disconnect.
- Whenever I connect my external SSD to my MacBook the Time Machine preferences pane is opened so that I can monitor the backup progress. Then, it's closed when I disconnect.
- Once a day a macro runs to check if a certain domain I'm eyeing is available.
Other Examples
Finally, let's dive into some random examples of macros I use and love. As mentioned before, I see Keyboard Maestro as a personal app in that it's likely to be tailored each user's needs and workflows, but I've certainly been inspired myself by seeing others' creativity.
A few of these have been set up as subroutines. In the organization subsection I explain what these are and how to use these.
Making a FaceTime Call
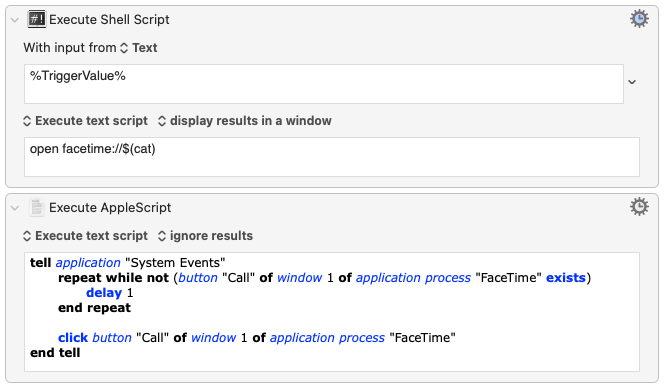
In the palettes subsection I describe my palette for making calls, among which FaceTime calls. The subroutine for this takes a parameter for the contact (like a phone number or an Apple ID) and then takes care of initiating the call.
Making a Zoom Call
Similarly to the FaceTime call subroutine, the Zoom call subroutine takes a parameter to then connect to a Zoom call. What's slightly different is that it leaves it more open what to pass along, so that you're able to join a public call (join?confno=123456789), join a passcode-protected call (join?confno=123456789&pwd=abcdef), or start a call (start?confno=123456789).

Performing OCR
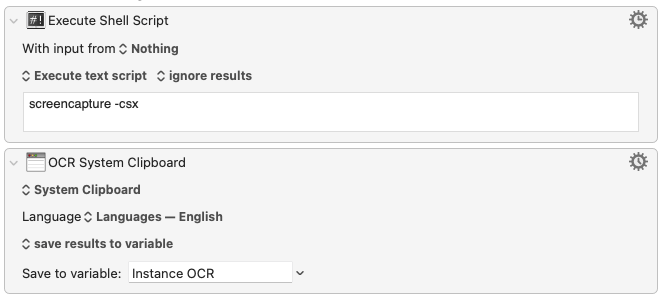
OCR (Optical Character Recognition) lets you pull text from an image. This subroutine only takes care of capturing the image, and then passes along the output to the macro that executed it for further processing. The screencapture command initiates taking a screenshot by dragging the mouse to select an area (-s) and then saves it to the clipboard (-c), and it does this without playing the usual screenshot sound (-x).
Toggling Do Not Disturb
There are a few instances where I need to set the Do Not Disturb state. It's not quite as straightforward as turning it on or off; instead, you need to toggle it. Thankfully, there's a way to check if it is currently active, which can then be used to act accordingly:
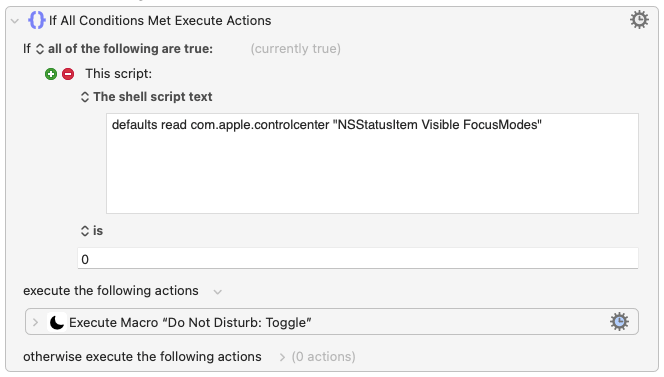
Create one that checks if the script is 0 to turn it on, and one that checks if the script is 1 to turn it off. The macro taking care of the actual toggling executes a keystroke, which is a shortcut I have set under System Preferences → Keyboard → Shortcuts. There, select "Mission Control" on the left, and configure a shortcut for the action "Turn Do Not Disturb On/Off". I went with Hyper-0, for no particular reason.
Syncing Browser Scroll Positions
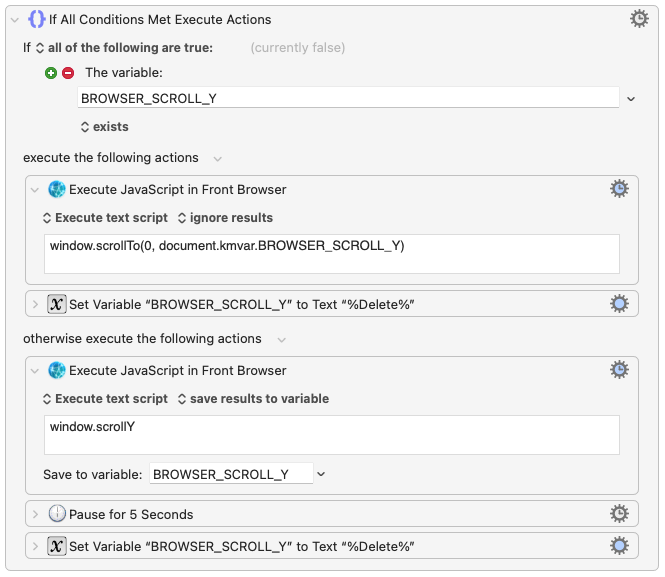
When I'm working on a site I sometimes want to try out different designs of the same element. To do this I open two tabs, make my changes in one tab, and then go back and forth between the two tabs to compare. Of course, it helps to then have the two tabs at the exact same scroll position so that there's no jumping around and you can focus entirely on the design changes.
This macro gets the scroll position from the front browser, saves it, and then, when triggered again within 5 seconds, will scroll to that position. If not used within that time it'll delete it, so that it's reset for the next use.
Starting and Stopping Modes
In the palettes subsection I describe my palette for different modes. Most of these modes just open up a few things, but for my work mode I have a system built in that toggles between starting the mode and stopping the mode.
To do this, in the start version I first perform all start-specific actions, then pause for 0.5 seconds so as not to interrupt those start actions, and then disable the start version and enable the stop version. In the stop version I do the same, except that I enable the start version and disable the stop version.
The great thing is that you can then give both versions the same trigger, and since only one of them will ever be enabled it just toggles between the two.
Conclusion
I could go on and on about all my macros, but this seemed like a good selection to give just a taste of what's possible. If you're interested in hearing more about any of this, let me know on Twitter!
